Sunday, 16 June 2013

My Snawheid mittens

Back in March I posted about the Snawheid hat I knitted using Kate Davies' pattern. Here I've taken it one step further!

P1030076

The hat turned out so well I was inspired to make mittens to go with it, and I started one almost straight away. 

P1020087

That was finished by Easter, but then I knitted another mitten (different yarn, different pattern) before I got round to ordering more of the Jamieson & Smith yarn for the second Snawheid mitten - so there has been a slight delay in getting the pair of these ready to wear. But now here they are, after a week's holiday on Tiree (Scottish Western Isles) I've had time to finish that second one off (and the weather is still just about chilly enough to wear them!).

P1030072


The colourwork makes these very cosy and snug, and after a gentle wash the yarn has come up feeling lovely and soft and full. As I mentioned in my previous post, I mashed up Kate's snowflake motif with the Lusekofte-sque mittens pattern from Ravelry and am really happy with the result!  I put rows of three and four snowflakes on the back of the mittens and left the palms plain.  From the Lusekofte-sque pattern, apart from the shape, I borrowed the border pattern.
The mitten pattern has a double thickness cuff at the top and bottom which I love, and I think it might translate onto socks quite nicely...

I did make these slightly bigger than the Lusekofte-sque pattern, adding an extra ten stitches to the width (I think!) and ten rows to the length, as well as an additional two stitches to the thumb and two extra rows (but I do seem to have fairly big hands).

The weather hasn't been too chilly lately so I'm hoping not to need these till winter starts. In the meantime, the garden's looking lovely....

P1030037

P1030047

Wednesday, 29 May 2013

The Tiree pebble

We're on holiday! Last Saturday we caught a really early ferry out of Oban to the tiny island of Tiree, right on the western edge of the Scottish Hebrides. 

P1020784

There's not much here, but there's beautiful beaches with beautiful pebbles and there's sheep's wool on the fences and beaches (I brought some fleece with me too, just in case). (If you're new to felted stones, see my original post for how I got inspired to make these).

P1020843

This white wool was from a beach at Hynish, in the south of the island.  I've no idea what breed of sheep this is from! I washed it with hand-soap to remove the lanolin and as much of the dirt as I could and teased it out, then let it dry.  Once it was dry I teased it out a bit more, then made it into a layer I could wrap round a pebble.  It wasn't as easy as using the combed fleece, because in that all the fibres lie in the same direction and it's easier to wrap it snugly round the pebble.  However, I managed, and felted it as usual - the wool did go very baggy during the felting but eventually formed a good and fairly even layer.  (Also in the picture above are too small pebbles ready to be felted with wool from Weardale - I like their little explosive haircuts!).

P1020809

This white wool has definitely formed felt, but it remains quite fuzzy.  My best felting action cannot seem to get these surface fibres to knit in! I noticed the same thing when I used white fleece from my previous felt kit; other wool types seem to make denser, closer felt - but this has its own character.

P1020908

So here is a memento of our holiday - a pebble from Tiree, felted in wool from Tiree! And, in this picture, picture nestling in a lovely new dish from Tyrii pottery.

Hoping your weather is as lovely as ours up here x

Thursday, 23 May 2013

The Graham quilt

Chances are, you won't have heard of the Graham quilt.  It now belongs to Killhope Lead Mining Museum (have I mentioned them before?!), but its story starts about 150 years ago in nearby Allendale.  And in between Allendale and Killhope, which are about a mile apart up at the tippety-top of the North Pennines, there's a journey to New York state and back.


Made by Hannah Peart in the early 19th century, the quilt is a traditional design known as a strippy quilt - literally meaning it's made of strips of fabric. This method of quilt-making is very much associated with this area, the North Country (really County Durham and Northumberland). 


The quilt top is made of three or four different prints, in seven strips running the entire length of the quilt.  Some of the fabrics are pretty faded now, which isn't surprising given the age of this quilt, and it's hard to know what the original colours would have looked like - I suspect there may have been quite a lot more red in the stripes that are now orange.


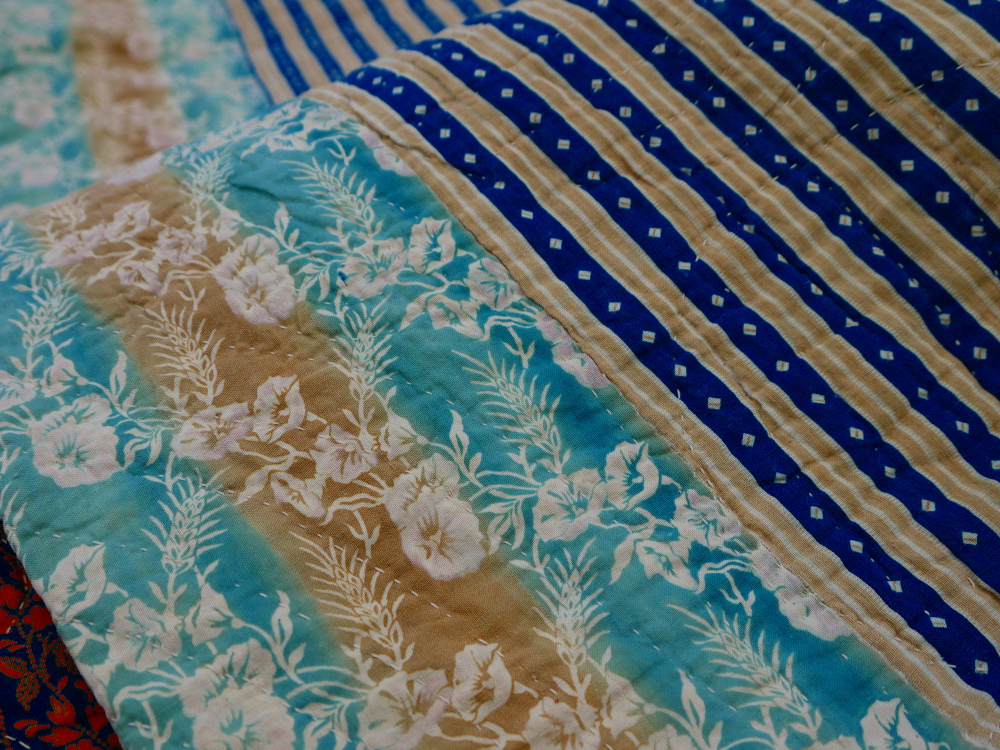
The back is a fairly coarse, creamy colour cotton.  All of the piecing and quilting has been done by hand on this double size  quilt, and the edges are finished by folding them over to the back and stitching down.


In 1854, Hannah emigrated from her home in the North Pennines to join her sweetheart Joseph Graham in New York state, taking the quilt with her.  He had travelled there a few years earlier to seek a better life in farming than he could make in mining in Weardale.  Hannah and Joseph married and spent the rest of their lives in America, writing home regularly to their family still in the North Pennines.  Joseph died in 1905, and Hannah in 1911.


Here's a picture of the quilt back, showing some of the quilting, which includes patterns in parallel lines, scallops and four-petalled flowers (you can see one petal in the picture above, enclosed in a diamond shape).  There are a few holes in the quilt back, but they don't look like moth holes.  In the photo below you can see quilting in scallops following the printed pattern on the fabric.


Amazingly, although Hannah didn't return to the UK, her quilt did.  In the 1980s, her great-grand-daughter brought the quilt, and letters sent to Hannah in America, back to the UK and presented them to the museum.  So this quilt, over 150 years old, is now back where it started and soon it will be on display to the public alongside the letters that Hannah and her family sent back and forth to each other across the sea. It's an amazing story!

Monday, 6 May 2013

Starry night

Today I can finally show you pictures of a quilt I finished more than two months ago - but the weather's been so dull and cloudy it was impossible to get any proper pictures of it! And I wanted the photos of this quilt to do it justice, because I'm very pleased with how it turned out, as is the recipient-to-be, Thomas (aged 8).

P1020536

This quilt features wonky stars made with Kaffe Fasset's shot cottons, with a background of Kona coal, a dense, dark grey.  I started off with a pack of shot cottons in 6-inch squares from Cottonpatch, then bought more of the colours I liked to make some bigger stars and to make the quilt backing.  By request, the back is orange! But actually this really works with the dark quilt top and its bright stars.  Also on the back I was asked to include the moon, which is appliqued.  The binding is in the same grey as the quilt top.

P1020519

P1020503

Here's the back - the orange is softer than it looks here.  As I had to join two pieces together, I put in a row off flying geese while I was at it. 


So finally today the weather was sunny. I photographed the quilt on a stone wall a short way from our house. It's alongside a public footpath so a few people passed as I was taking the pictures, but nobody asked any questions!

I've quilted this with a mix of hand and machine stitching. I stitched radiant lines by hand on the stars in a  colour to match each star, and went round each one in pale silvery grey.  Between the stars I used my machine to quilt "swooshes", as if these were shooting stars, using dark grey as a top thread and orange in the bobbin so that this machine quilting is more texture than pattern.

P1020515

I'm so happy with this one, and so is Thomas. The only problem is he's having to wait before he can use it until I've finished Kitty's quilt! And that's another story you can read here..

Please leave me a comment and let me know what you think of this quilt - I'd like to know!
- Vicky x

Have you ever seen anything like these?

Felted stones - they're all the rage in our house right now!

A few days ago I came across this blog by Lisa Jordan and these stones encased in beautiful hand-made, embroidered felt.  I fell in love! Lisa makes these using combed fleece fibres and the traditional felt-making technique of soap, water and agitation.  There's a tutorial on her blog.


Felted stones by Lisa Jordan of  Lil Fish Studios


Last October a friend gave me a felt-making kit (from Ellie Langley of Fleece With Altitude at Slackhouse Farm) which I've been meaning to get stuck into. Well within 24 hours of seeing the stones, I'd got one of my own!

I nipped out to the porch and rummaged through the box of seaside stuff we dragged back from Colonsay last year till I found a suitable stone, and followed Lisa's instructions.  Didn't take long, with soap, rubbing and hot water, to turn fleece into felt.  Previously I had entertained tame ideas of making flat felt to cut into Christmas decorations or something, but this is so much more exciting - I haven't felt (ha! geddit?) this excited about a new project for a long time!

Once my new stone, soft but satisfyingly heavy, was dry, I tried out some half-forgotten embroidery on it.  And this weekend the kids got excited about covering stones in felt, so we have a growing collection....

A week on, I've made four felted stones in four different types of fleece:

P1020655


Clockwise from top left, these are felted in Wensleydale, Jacob, Sheltand and Blue Faced Leicester wool. I absolutely love them, and there will be many more. Right now I love the natural colours of these undyed wools, but I might do some coloured ones soon.

P1020661


This white one, with bullion knots and running stitch, reminds me of a sea urchin.  The felt remained quite fuzzy and loose, the fibres didn't want to knit together any more than this. The pale grey Shetland wool on the other hand formed a very even, dense felt very quickly - and you could see that it was going to even before I got it wet as the fibres were short and very fuzzy whereas the white Wensleydale was sleek and long-fibred.

P1020659


Keep watching for more felted stones here soon...

Wednesday, 1 May 2013

Tutorial: marking out a sashiko grid


If you haven't done sashiko before, here's how I set out the grid on the fabric.
You'll need your fabric, a white dressmaking pencil, and a ruler (preferably a grid ruler, although an ordinary one would do if you don't already have a grid).

For the sashiko bag I used a 1" square grid, with 2" and 1.5" circle templates.
For the sashiko cushion I used rectangular grid - 3/4" horizontal spacing, 3/8" vertical spacing.

P1020171

1. Wash and damp-press your fabric.  Fabric with a medium weight, such as linen, seems to work best - avoid anything too light, such as quilting-weight cotton.

2. Once the fabric is really flat, cut the piece you'll work on - make it a couple of inches bigger all round than you want the final size to be, to allow for a bit of fraying and the final trimming.  I would recommend starting with a fairly small project, maybe a 6" square sampler. Lay the fabric on a hard, flat surface (cutting mat is good).

3. Sharpen a white dressmakers pencil.  Use it to draw a straight line about two inches from the bottom edge of your fabric; this is your baseline.  Keep the pencil really sharp the whole time you are marking out your grid so that all your lines are fine.

4. Working upwards from each end of the baseline, make marks at 1" intervals (square grid) or 3/8" (rectangle grid).  Avoid parallax errors by getting your eyes right above the bit of the ruler you're using!  Join these marks to make a series of lines parallel with the baseline.

5. Draw a vertical line about two inches from the left side edge of your fabric, making sure it forms right angles with the horizontal lines you've just completed, and crossing the ends of the horizontal lines.  This is where having a grid ruler really helps, as you can easily make sure all your vertical lines fall at right angles to the horizontal ones.

6. Working to the right, make marks on the baseline and the topmost line at 1" intervals (square grid) or 3/4" intervals (rectangle grid).  Again, be sure these are exactly spaced.  Join the marks (you may need to turn your fabric through 90 degrees) to form your grid.

7. Your grid is done. You'll now need to mark on the pattern you're going to stitch, for example using circle templates or marking diagonals for a hexagon-based design.  I'll try and cover some simple patterns in another tutorial soon!

Thursday, 25 April 2013

Sashiko Part II (cushion)

It's spring! Here in the north of England, spring is very late this year, but finally things are starting to grow.  Here's my rhubarb, unfurling its leaves at last.

P1020473

Where was I?
Sashiko.  Inspired by how many people liked my sashiko drawstring bag, I went bigger with my next project - a cushion cover.  Like the bag, this is also based on a pattern in Susan Briscoe's book, although I did make it to fit a slightly different sized cushion.

P1020442

I used the same navy linen as before (this was from Celtic fusion fabrics), and white, red and dark yellow thread.  To begin with I marked out a grid of rectangles, each 3/4 inch wide and 3/8 inch high. This took ages! I used a white dressmaking pencil and it did tend to rub off, so I had to remark as I worked my way up the cushion.

The patterns are all based on hexagons, which is why they all fit together.  From the bottom they are Tsuno kikko (horned tortoiseshell - the large hexagons), Arare kikko (hailstone or segmented tortoiseshell), Juji kikko (cross tortoiseshell) and Kasane kikko (layered tortoiseshell - the tall hexagons).

P1020449

It was only when I came to make the sashiko into a cushion cover that I thought red piping would finish the whole thing off really well, and luckily I had some red fabric with a linen-y texture that was perfect for the job. I even found piping cord and a navy zip stashed away, so no waiting till I could get to the shops to complete this cushion, which is a birthday present for my mum. It has to go in the post tomorrow, so it was fortunate we had a little bit of sun this evening and I could get these photos in natural light.

P1020469


P1020448

I'm hoping to finish off several other sewing and knitting projects next, so possibly no more sashiko for a while. But having completed the bag and this cushion I have lots more ideas for ways to use these beautiful, ancient patterns on my projects.
(I finally ordered the wool I need to finish off the right hand mitten to match my Snawheid hat, although in the meantime the 2.5mm needles seem to have got involved in another project...)

Back soon x
Related Posts Plugin for WordPress, Blogger...