Wednesday, 20 November 2013

New shop!

I've taken the plunge and listed a couple of things in a new Etsy shop! Have a look here (new shop) or on the Shop tab above and leave me a comment below if you like. I'll add more things very soon.

So far, there's this quilt, and this bag.

Bag Quilt


Hoping to add some more in the next week x


Friday, 25 October 2013

Hexagonal work in progress

I've been working on some hexagons, inspired by this quilt, using up fabric I already had in some muted, modern colours. I don't have a pattern, but I do have a ruler with a 60 degree angle marked on it, so I studied how other people had created hexagons and off I went.


For each segment of a hexagon, I'm sewing a 60 degree triangle to a strip of fabric, then trimming the joined pieces into a large 60 degree triangle. Then I sew three of those together to make a half hexagon.  Eventually I'll lay out all of those how I want them in the quilt, and join them into vertical strips; then when the strips are joined, the full hexagons will appear without me having to sew complicated Y seams.


And to finish here's a trial quilt layout, with some sage green chambray fabric from Village Haberdashery (London)


Thursday, 10 October 2013

Orange peel

Just a quick post with picture of Not Orange Peel finally finished.  There was only just enough sunlight to get these pics...

First the whole quilt, showing how the stems (of varying lengths) and leaves are laid out:
  P1040075

Some quilting detail: the lines were machine quilted in expanding curves - marked out in washable pen
P1040088

Along one side of the back, a rainbow stripe which uses one piece of every "leaf" fabric used on the front:
P1040083

More quilting action:
P1040089

And another part of the rainbow strip
P1040084

I have to say it turned out looking really nice, and I'm very pleased with it.
Next quilt has hexagons on....

Sunday, 6 October 2013

A new sort of bag

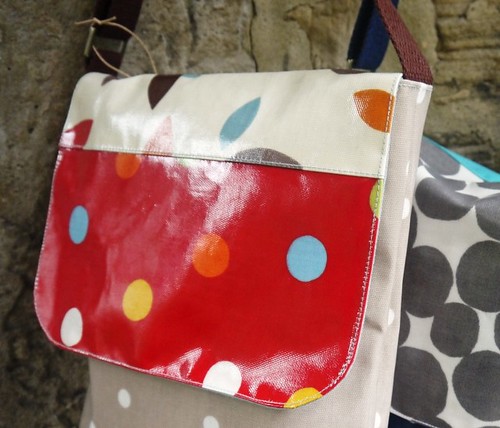
Have you ever used coated cotton for your sewing?  I'd made a few aprons from it in the past, but never ventured into the sort of "3-D" territory that I regularly do with ordinary fabric - until now.

I've been making some satchel-style bags and the results seem good, although I have a few further refinements in mind.  The pattern I used here is a mash-up of stuff I've seen made elsewhere, and some tips from the wonderful internet, with my own sizes and ways of finishing things thrown in!

P1040110

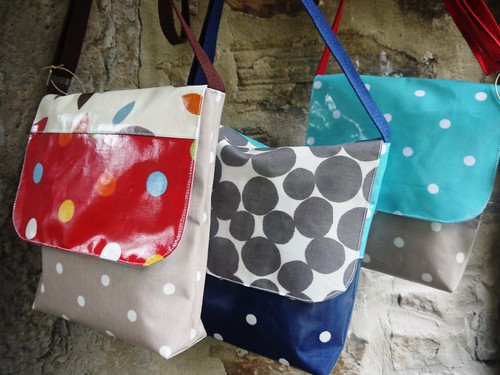
Above are some bags I recently finished, using up some scraps of coated cotton and some bigger new bits.

So here are my top tips for sewing with coated cotton:
1. If you pin, make sure it's in the seam allowance. Holes in this stuff stay!
2. When sewing, your ordinary polyester thread is fine. For top-stitching you'll be better using something a bit thicker, maybe linen thread.
3. Use a big needle, it makes a great difference. I use a number 90 and it sews very well, even through two layers of coated cotton, two layers of webbing and a lining!
4. Practice sewing on a scrap before you put your project under the presser foot, to make sure your tension, stitch length etc are all good.
5. A walking foot solves all problems of this stuff sticking to the stitch plate or presser foot. They cost a little bit, but once you've got one you'll use it loads.
6. Avoid turning bags inside out and back again numerous times - you can iron coated cotton, but some creases stay longer than others.

P1030799

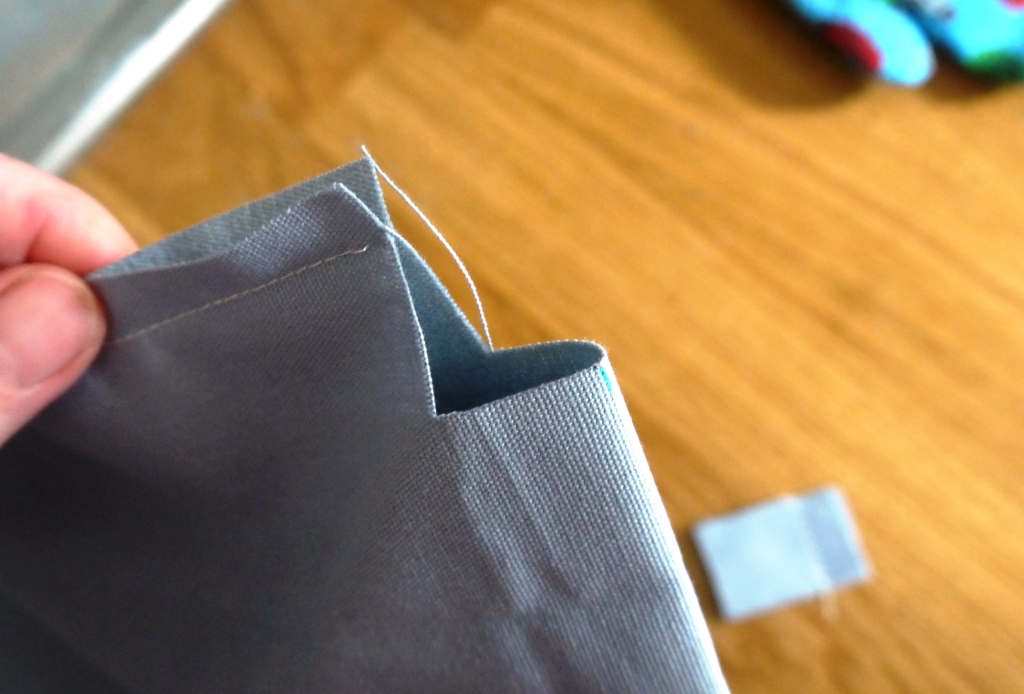
Here's the inside of a bag, showing an internal pocket and also the top edge, and strap adjuster.
Next up I'm trying coated cotton in combination with zips! Should be interesting...

P1040111

Saturday, 28 September 2013

Birdy book

Had an hour or two spare today, so I had a play with machine embroidery. I've made notebook covers before, but only with patchwork, but I see more covers with pictures coming soon!

P1040092

I make my covers using pretty much the same method as Rachel at Stitched In Colour - a link to her tutorial is here.

The colours in these photos aren't great (summer's over!) - this blue cover is a deep turquoise, and the bird's wing deep pinky-purple. These notebooks are about A5 size. I've added a ribbon bookmark with a felt ball on the end. In fact seeing the bag of felt balls, which I've had for months but haven't got round to using (but they're lovely to play with - get yours from Blooming Felt), inspired me back into notebook-covering.

P1040094

Next time I'm going to use Bondaweb to make sure there's not so much fraying on the bird shape - this time I used my standby Pritt stick. Well, it works!

P1040096

Watch this space for more notebooks soon x

Sunday, 15 September 2013

Not orange peel - quilted, finished, loved

At last, it's done!  I've finished machine quilting Not Orange Peel, and am really, really pleased with it!
Here are a few pics taken when I'd finished the quilting but before I'd trimmed and bound the edges.

P1030920

The quilting pattern was inspired by a tree, with branches flowing and dividing organically. It starts in a bottom corner, and flows up and across the quilt, curving right back on itself at the bottom and the right edges. I quilted with Guterman 100% cotton, as I couldn't get to the quilt shop to get a big reel of anything like Aurifil.

P1030925

Here's the back, which is my favourite Flea Market Fancy print, plus a rainbow border made from one piece of every colour I used on the front.

P1030930


P1030921

And here's the binding, ready to go on - lovely pale spots! (it's a print I used in the background of the front quite a bit)

P1030931

To follow very soon - pics of the completed quilt (just as soon as I can get it away from my daughter's bed, it was made for her and she really loves it already - what more could I ask?)

Tutorial: easy box corners

You know when you want to give your bag/purse/pouch a bit of depth at the bottom, you have to make that seam across the corner? And you know what it's like trying to fiddle around matching up the seams so it looks neat, sticking a pin through, wiggling it about a bit, making sure there's not a pleated-up bit on the other side.....well now you don't need to do all that.  Here is my way of making boxed corners.

1) Sew your side and bottom seams as normal. If you're leaving a gap in the bottom seam for turning, make sure you've left enough room for the box corner seam.

2) Mark a square on each corner that you want to box.  To work out the size of this square, first calculate how long you want the finished box seam to be - let's say you want an 8cm seam.  This will be split between the two sides of the bag, so that's 4cm each side. Then take off your seam allowance, say 1cm, and you're left with the square size - in this case 3cm. See the diagram below! Mark this accurately (e.g. with a grid ruler) using a fading or washable marker or a pencil.


3) Get your sharp scissors out. Making sure your sewn piece is lying nice and flat, chop out this marked square - eek! A hole in your bag!!

4) Now pull the sides of the bag apart, so the seams meet (or seam and centre bottom fold in my case). Finger press seams open, check they match a little further down by peeking in, pin in place, then finger press the 45 degree fold at each edge.


5) Stitch across the raw edges you just cut and pinned, using 1cm seam.  Your corner is perfectly boxed!


Related Posts Plugin for WordPress, Blogger...