Monday, 2 February 2015

Bunk beds

For Christmas, my daughter had twin dollies on her list, and obviously they needed bunk beds.  My husband made the bed frame, and I made the fabric bits - hammock beds and quilts!

P1060589

Fran and Katy are 40cm dolls (made by this FairTrade company), so the bunks are about 50 cm long and 20 cm wide.  They seem to sleep well in them, in fact some days they don't get up at all.

P1060604

Each little quilt is 25cm x 30cm, made with quilt batting and binding, but no quilting so they're not too stiff.

P1060602

Sweet dreams, girls xx

Thursday, 22 January 2015

Zippy trippy three

This one was a Christmas present, which worked out really well.  Slightly smaller than Zippy Trippy and Zippy Trippy Two, to make it easier to get through the machine when stitching the central piece once the cardboard has been placed inside.

P1060543

On the front is a bird which may (or may not) be a peacock, on a red background with quilted straight lines.

P1060537

Inside, the usual clear pocket on one side, and on the other a whole load of pencil slots and a small pocket.  I was particularly pleased with my colour choices for this one, especially the red edge on the pencil slots!

P1060548

P1060539

Also, for this one I covered a small notebook to match, giving it a red spine.

Although there's a lot of work in these pencil cases, they are very satisfying to make.  As before, this is a modification of Anna Graham (Noodlehead)'s Road Trip pattern.  Love your pattern Anna!

Wednesday, 3 December 2014

Get felt here

Ha ha.  Yes, I made some more felt.  Some time ago I moved on from felting around stones to making flat felt, which was lovely and makes a good mat.  But it's two-dimensional and I need three dimensions!  Then a friend showed me some felt pods she'd been given, and I went straight home and looked up how to make them - I found this tutorial.  Here's a picture of one from the tutorial:

Felt pod by RosiePink

I dragged out my fleece and had a go, starting small in case things didn't work out quite as planned.  I cut a circle from some old bubble-wrappy-type packing (it had foam bonded to it so was quite stiff, which was good), and followed the tutorial step by step.  After the usual rubbing and rolling with warm water and olive oil soap, followed by cutting a hole (scary!), then more rubbing and hot water, I had my first felt pod!

P1060397

I made it with green wool inside, and grey outside - I always like a pretty surprise inside a bag, so why not inside a felt pod.  My resist (the plastic inside) was a circle 10cm diameter, and the finished pod is about 8cm across and 5cm high. I cut the hole to one side, to make a little "nest" shape for keeping coins or jewellery in.  Later, I stitched some seed beads on for decoration.

The next pod had blue wool inside, and the third, pink wool.

P1060393

The fourth pod is really the best so far.   I cut the hole centrally this time, and added more layers of grey wool before I began felting.  When fully felted, this one has turned out much more sturdy than the others, which feel a bit thin and may not hold their shape as well.  So for future pods I'm sticking to one layer of the inside colour, then two or even three layers of the outside colour.

P1060464

Using more layers of wool seems to limit the shrinking that happens during felting, too, as the fourth pod is slightly bigger, even though it was made on the same resist.

P1060473

Now these small pods are working out well, I'm going to try making a slightly bigger version.  Felty Christmas presents all round this year!

Wednesday, 26 November 2014

Tu-whit tu-whoo!

How about this bag with an owl looking after the front?

P1060403.JPG

I sewed this one up just before I was taking my bags and purses to a Christmas sale, using Noodlehead's (free!!) trail tote pattern for Robert Kaufman.  I'd had the idea of a bag with an owl on the front flap for ages, then I saw this round-based bag pattern and thought it would work really well.

P1060408.JPG

Of course, the Noodlehead pattern doesn't have a front flap, so I made my own pattern piece for that.  I also missed out the piping as I was working with velvet and fleecy interlining, so had enough bulk to contend with already! When I make the pattern with lighter weight fabric, I'll definitely use piping because it gives such a lovely finish.

P1060407.JPG

I also did something different to sew my strap on than the pattern says.  I find it easier to stitch the strap to the outside seams of a bag, before the lining goes in - that way, there are fewer layers to get the machine to stitch through when you go around the top edge.  Also, when you open the bag the strap then falls away from the opening.

owl

Finally, instead of using a magnetic snap to close the bag (I didn't have one handy), I added a small ribbon loop in the back seam with a big popper on.  That means the bag can be closed without the owl on the lid being pulled out of shape - it can just hang around being an owl!

Sunday, 23 November 2014

Sew Together bag

I really *heart* this bag! It's a great pattern, and works really well.  I chose linen for my bag outer, with some Liberty lawn scraps on the front, Liberty lawn binding, and for the inside pockets I've used a mixture of Kaffe Fasset shot cottons and more Liberty lawn.

P1060049.JPG

The pattern does use a lot of zips, but to great effect.  If you're not sure about sewing zips in when you start, you will be by the end of this!  I really liked how the bag turns into a round-shaped thing when it's finished, even though it only uses straight seams, and the extra-long top zip lets the bag open really wide.

P1060059.JPG

I chose to stitch the second edge of my binding down by hand, as I wasn't sure I could do it completely neatly by machine.

P1060063.JPG

To me this bag turned out perfectly.  Liberty lawn makes anything look good, and mixed with linen it's divine!  Try some today!

Wednesday, 22 October 2014

Zippy trippy two

It was kind of inevitable - once one child had one, the other wanted one! So here's my second Zippy Trippy (based on Noodlehead's pattern).

P1060282

This one has a denim outer, with (by request) a USB symbol on. Inside there's the same vinyl pocket as before, some pencil slots, and also some small pockets for memory sticks and calculator. The binding and pockets are made with some really cool circuit board fabric that I found.

P1060276

Both Zippy Trippies are in regular use I'm pleased to say. They're a bit of a faff to make, especially sewing that last central piece in place once I've put cardboard in the front and back (I don't think the Noodlehead pattern uses this), but worth it. I'll never get tired of zipping that zip all the way round!

P1060281

This might be the last one of these I make for a while. Seeing them being used makes it worth the effort of completing them, but they're still a whole lot of work! My next project is a pattern that's all my own....watch this space....

Wednesday, 10 September 2014

Some vintage hexies

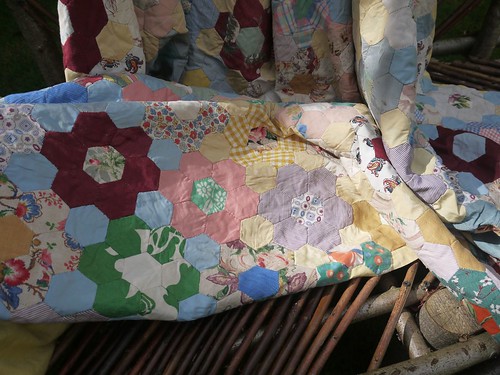
Here's my grandmother's quilt:

P1060102

P1060118

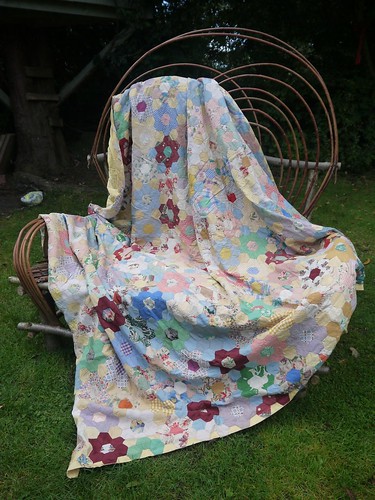
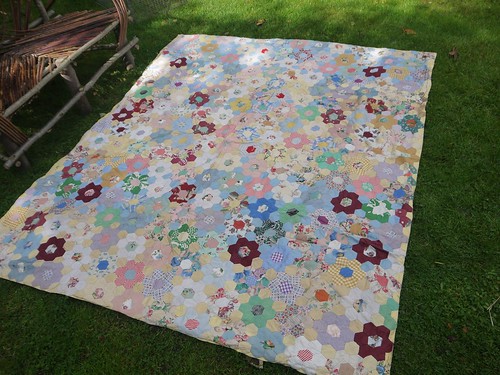
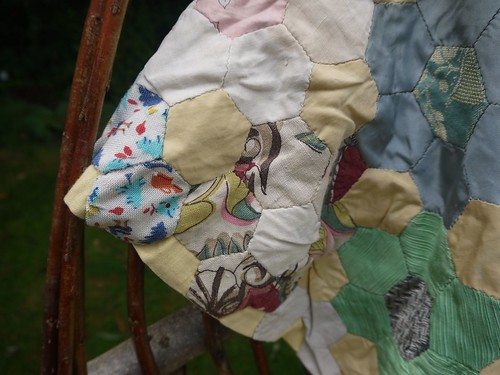
Well, really I think it's a coverlet, as it has no wadding, just the top layer and backing. It was made by my grandmother in the 1950s, entirely from hand-stitched English paper pieced hexagons. The fabrics are a mixture of furnishing fabrics and dress fabrics, with a yellow chintz back. Between the hexagon-flowers, there are pale yellow and blue background hexagons.

P1060116

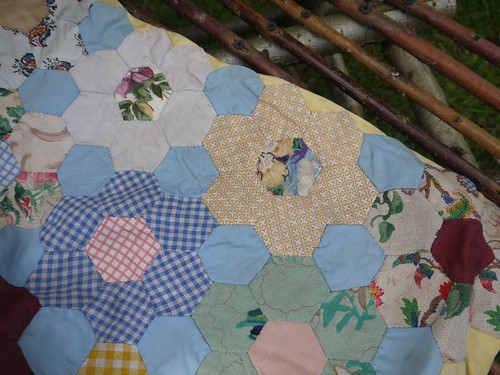
Each of the 132 flowers in the patchwork is made of seven hexagons, joined to its neighbours and the other rows with two of the background (yellow or blue) hexagons. So, not counting all the bits at the edges, that's at least 132 x 9 = 1,1188 hexagons. All cut from paper and fabric by hand. WOW!!

P1060114

This coverlet is big enough for a double bed. It's very well preserved, with only a few frayed patches, so I'm not sure it was ever used very much.

P1060117


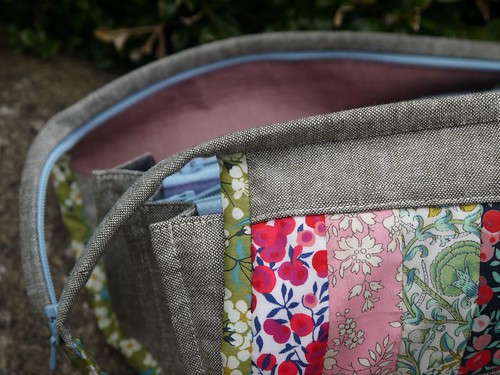
Hexagons are my favourite shape of all time! They remind my of bees, and how industrious they are.
I have a hexagon quilt in progress, and another hexagon project in mind - but I'm afraid I don't have the patience to hand-stitch mine together! My quilt hexagons are made from half-hexagons joined into strips and then the strips stitched together. One day I might persuade myself to make a small piece of paper-pieced hexagon patchwork with Liberty scraps, but likely not this year!

Related Posts Plugin for WordPress, Blogger...