Showing posts with label Tutorial. Show all posts

Friday, 14 March 2014

Simple zipped inner pocket tutorial

For ages I made bags with inner pockets that were just patches - a rectangle of fabric sewn onto the lining, sometimes with a popper to keep it closed. Then recently I discovered it's really pretty easy to make a hidden, zipped pocket! So I've written this tutorial to show you how to make a hidden zipped pocket - it's pretty straightforward, there are just eight steps.

You'll need to have your bag lining pieces ready to go (i.e. cut to size and shape), but preferably not sewn together yet, and definitely not sewn into the bag. If you're worried about how this pocket process might work out, I recommend trying it on some scrap fabric. You can always take the zip out when your practice version is done and use it again, especially if you set your stitch length to something quite long to make unpicking easier!
Here's a couple I've made recently...


P1040801


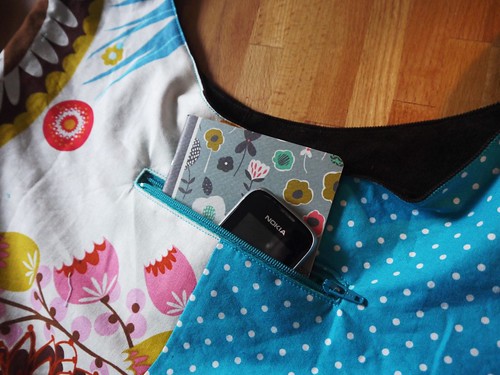
So if you'd like to add a neat, useful pocket to your next bag, read on!

1) What you need. You'll need a zip, and two pieces of fabric each about 12x14cm (but the size is entirely up to you!). Your zip needs to be at least 15cm long for a pocket big enough for something like a mobile phone or small notebook to fit in the pocket.


I've successfully used short zips I've "harvested" from old trousers and skirts that I'm upcycling (if you do this, just watch that you don't zip the zip pull off the end of the zip once it's out of the seam, as they don't always have a stop).

2) Mark pocket zip position. First you need to make a long, narrow 'window' in the bag's lining, with one of your pocket pieces attached behind. To do this, mark a line on the right side of your bag lining where you want the pocket zip to end up. Make it 2cm or more SHORTER than your zip. I recommend using a washable marker or chalk here. Note that in the photos for this tutorial my bag lining is already sewn along the top of my bag exterior, but is still open at the bottom so I can access the wrong side of it. Also, it's made of two different fabrics (a floral and a polka dot).


Transfer the line to the wrong side of the lining, and draw a box around it, on that wrong side, 1cm wide and 0.5cm longer at each end; this will be your stitching line. (In the picture below, the box is marked on the right side of my lining, but you do also need it on the wrong side).


3) Place first pocket piece. Flip the lining right side up. Lay one pocket piece, with right sides together, on the right side of the bag lining. Have the top edge of this piece only 2cm above the line you drew.  Pin in place around the edges. This photo shows the pocket piece being laid over the marked line and box:


4) Sew first pocket piece. Flip again, so lining is wrong side up and you can see the box you drew. Now sew around the box, keeping it as neat, straight and square as possible. I've sewn in red thread here so you can see exactly what's going on:


5) Cut the pocket opening. CUT (!!) neatly along the line in the centre, through both the bag lining and the pocket piece, extending the cut diagonally into the corners. Make very sure not to cut anything else that might be flapping around underneath your lining!


Here's the completed long cut and diagonal snips, from the other side:


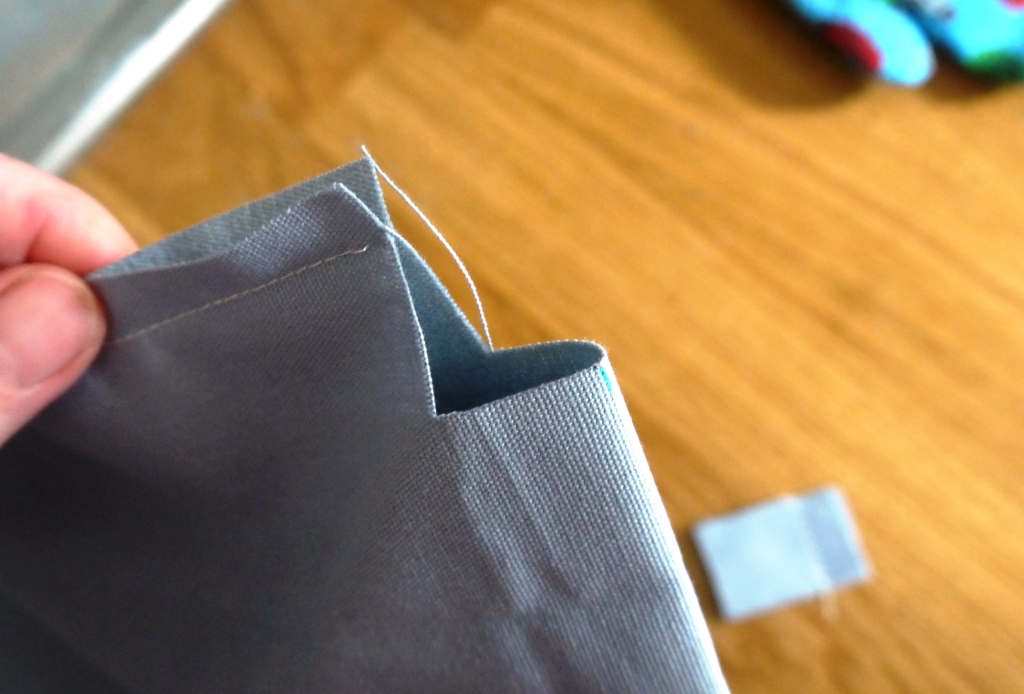
6) Press your seam. Push the pocket piece through the cut, laying it flat on the wrong side of the bag lining. Press the seam into a neat fold, to leave a narrow window - this opening will hold your zip.


7) Sew zip into the opening. With the right side of the bag lining facing you, pin the zip in place behind the opening and baste into place, keeping the pressed edges 1cm apart along the whole length of the opening. Make sure the zip pull is visible within the opening!


Fit a zipper foot to your machine.Using small stitches and stitching slowly, sew all the way around the opening, being particularly careful to stitch straight (and not to break the needle!) at each end where you have to sew across the zip teeth. You may need to move the zip pull out of the way as you sew along the length of the zip.


If necessary, trim zip ends so there is no more than 2cm beyond the stitching at either end. Now you have a zipped opening in your bag lining, but behind it there's no pocket! We'll put that right next.

8) Attach second pocket piece. The last step is to attach the other pocket piece. With right sides together pin the second pocket piece to the one already attached to the bag lining.


Making sure not to catch the actual bag lining in the seam, stitch around all four sides of the pocket pieces with 1cm seam allowance. It's worth double-stitching the bottom pocket seam now, as getting in there to repair it once the bag is finished will be tricky.


8) Finished! You now have a hidden, zipped pocket in your bag lining! Finish your bag lining as per your pattern, and sew into your bag. Enjoy zipping and unzipping your pocket!

P1040801

Sunday, 15 September 2013

Tutorial: easy box corners

You know when you want to give your bag/purse/pouch a bit of depth at the bottom, you have to make that seam across the corner? And you know what it's like trying to fiddle around matching up the seams so it looks neat, sticking a pin through, wiggling it about a bit, making sure there's not a pleated-up bit on the other side.....well now you don't need to do all that.  Here is my way of making boxed corners.

1) Sew your side and bottom seams as normal. If you're leaving a gap in the bottom seam for turning, make sure you've left enough room for the box corner seam.

2) Mark a square on each corner that you want to box.  To work out the size of this square, first calculate how long you want the finished box seam to be - let's say you want an 8cm seam.  This will be split between the two sides of the bag, so that's 4cm each side. Then take off your seam allowance, say 1cm, and you're left with the square size - in this case 3cm. See the diagram below! Mark this accurately (e.g. with a grid ruler) using a fading or washable marker or a pencil.


3) Get your sharp scissors out. Making sure your sewn piece is lying nice and flat, chop out this marked square - eek! A hole in your bag!!

4) Now pull the sides of the bag apart, so the seams meet (or seam and centre bottom fold in my case). Finger press seams open, check they match a little further down by peeking in, pin in place, then finger press the 45 degree fold at each edge.


5) Stitch across the raw edges you just cut and pinned, using 1cm seam.  Your corner is perfectly boxed!


Wednesday, 1 May 2013

Tutorial: marking out a sashiko grid


If you haven't done sashiko before, here's how I set out the grid on the fabric.
You'll need your fabric, a white dressmaking pencil, and a ruler (preferably a grid ruler, although an ordinary one would do if you don't already have a grid).

For the sashiko bag I used a 1" square grid, with 2" and 1.5" circle templates.
For the sashiko cushion I used rectangular grid - 3/4" horizontal spacing, 3/8" vertical spacing.

P1020171

1. Wash and damp-press your fabric.  Fabric with a medium weight, such as linen, seems to work best - avoid anything too light, such as quilting-weight cotton.

2. Once the fabric is really flat, cut the piece you'll work on - make it a couple of inches bigger all round than you want the final size to be, to allow for a bit of fraying and the final trimming.  I would recommend starting with a fairly small project, maybe a 6" square sampler. Lay the fabric on a hard, flat surface (cutting mat is good).

3. Sharpen a white dressmakers pencil.  Use it to draw a straight line about two inches from the bottom edge of your fabric; this is your baseline.  Keep the pencil really sharp the whole time you are marking out your grid so that all your lines are fine.

4. Working upwards from each end of the baseline, make marks at 1" intervals (square grid) or 3/8" (rectangle grid).  Avoid parallax errors by getting your eyes right above the bit of the ruler you're using!  Join these marks to make a series of lines parallel with the baseline.

5. Draw a vertical line about two inches from the left side edge of your fabric, making sure it forms right angles with the horizontal lines you've just completed, and crossing the ends of the horizontal lines.  This is where having a grid ruler really helps, as you can easily make sure all your vertical lines fall at right angles to the horizontal ones.

6. Working to the right, make marks on the baseline and the topmost line at 1" intervals (square grid) or 3/4" intervals (rectangle grid).  Again, be sure these are exactly spaced.  Join the marks (you may need to turn your fabric through 90 degrees) to form your grid.

7. Your grid is done. You'll now need to mark on the pattern you're going to stitch, for example using circle templates or marking diagonals for a hexagon-based design.  I'll try and cover some simple patterns in another tutorial soon!
Related Posts Plugin for WordPress, Blogger...